Ship Your MVP from Home: Ditch Expensive Servers with Cloudflare Tunnel

You have a powerful computer sitting under your desk. Meanwhile, you're paying $50–200/month to run your MVP on someone else's computer. Let's fix that.
This guide walks through how I set up a home server with Cloudflare Tunnel to host multiple web apps — for $0/month in infrastructure costs. I'll also share a real debugging war story about HTTPS that'll save you hours.
The Problem
Cloud server costs add up fast when you're building:
| Service | Monthly Cost |
|---|---|
| DigitalOcean Droplet (4GB) | $24 |
| AWS EC2 t3.medium | $30 |
| Heroku (2 dynos + DB) | $50+ |
| Vercel Pro | $20 |
| Managed DB (Postgres/MySQL) | $15–50 |
Run two or three apps and you're easily at $100–200/month before you have a single paying customer.
Meanwhile, your home machine — probably 16–64 GB RAM, 8+ cores, 1 TB SSD — is idle 80% of the time.
The catch has always been: how do you expose a home machine to the internet without a static IP, port forwarding, and a prayer?
Cloudflare Tunnel.
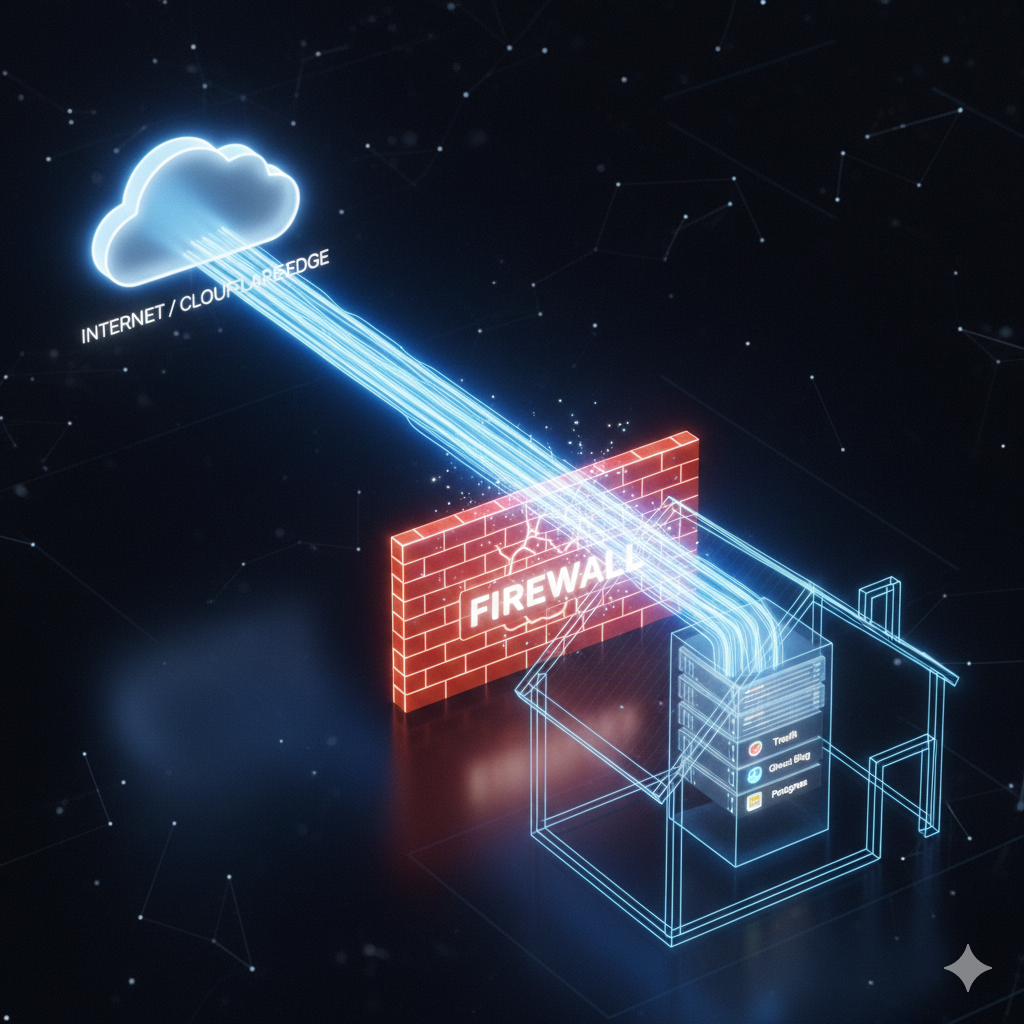
The Architecture
Here's how traffic flows:
Browser (HTTPS)
    ↓
Cloudflare Edge (terminates TLS)
    ↓ (encrypted tunnel, outbound from your machine)
cloudflared daemon (your home machine)
    ↓ (HTTP)
Traefik reverse proxy (port 80)
    ↓ (HTTP)
Your app containers (Ghost, Postgres, whatever)
The key insight: your machine makes an outbound connection to Cloudflare. No port forwarding. No static IP. No firewall holes. Cloudflare routes incoming requests back through that persistent connection.
What You Need
- A home machine — Linux recommended (Ubuntu/Debian). Any old desktop or mini PC works.
- Cloudflare account — Free tier is enough.
- A domain — Pointed to Cloudflare's nameservers.
- Docker — For running your apps.
- Coolify — Self-hosted PaaS (free Heroku alternative). Or use Docker Compose directly.
Step 1: Install cloudflared
Install the Cloudflare Tunnel daemon:
# Debian/Ubuntu
curl -L https://github.com/cloudflare/cloudflared/releases/latest/download/cloudflared-linux-amd64.deb -o cloudflared.deb
sudo dpkg -i cloudflared.deb

# Authenticate with your Cloudflare account
cloudflared tunnel login

# Create a tunnel
cloudflared tunnel create office
This gives you a tunnel ID and a credentials JSON file. Note both — you'll need them.
Install it as a system service so it survives reboots:
sudo cloudflared service install
sudo systemctl enable cloudflared
sudo systemctl start cloudflared
Step 2: Configure the Tunnel
Here's my real config.yml (at ~/.cloudflared/config.yml):
tunnel: a564a227-4d0d-4d12-92fe-e88298de08e8
credentials-file: /home/kevin/.cloudflared/a564a227-4d0d-4d12-92fe-e88298de08e8.json

ingress:
  # Coolify dashboard
  - hostname: coolify.httprapidoccasions.com
    service: http://localhost:8000

  # SSH access (must be before wildcard)
  - hostname: ssh.httprapidoccasions.com
    service: tcp://localhost:22

  # Wildcard — all deployed apps route through Coolify's Traefik
  - hostname: "*.httprapidoccasions.com"
    service: http://localhost:80

  # Catch-all
  - service: http_status:404
The magic is the wildcard rule. Any subdomain (app1.yourdomain.com, app2.yourdomain.com) routes to Traefik on port 80, which then routes to the right container. Deploy a new app, give it a subdomain — it just works.

DNS Setup
In your Cloudflare dashboard, add a wildcard CNAME:
Type: CNAME
Name: *
Target: <tunnel-id>.cfargotunnel.com
Proxy: enabled (orange cloud)
And one for the base domain or specific subdomains as needed.
Step 3: Set Up Coolify
Coolify is a self-hosted PaaS — think Heroku or Vercel, but free and running on your own machine. It gives you:
- Git push deployments
- Automatic SSL (via Traefik, which it manages)
- Database provisioning (Postgres, MySQL, Redis, etc.)
- A web dashboard for managing everything
Install with one command:
curl -fsSL https://cdn.coollabs.io/coolify/install.sh | bash
After installation, access the dashboard at http://localhost:8000 (or through your tunnel at coolify.yourdomain.com).
Coolify runs Traefik as its reverse proxy on port 80. This is what the wildcard ingress rule in our tunnel config points to.
Step 4: Deploy Your First App
Let's deploy Ghost (the blogging platform) as an example.
In Coolify:
- New Resource → Docker Compose
- Paste your compose config or connect a Git repo
- Set the domain to
blog.yourdomain.com - Deploy
Coolify handles the Traefik labels, container networking, and routing. Your app is live at https://blog.yourdomain.com within minutes.
Want another app? Same process, different subdomain. The wildcard tunnel + wildcard DNS means zero infrastructure changes per app.
The HTTPS Gotcha (This Will Save You Hours)
Here's where I burned time so you don't have to.
The Symptom
After deploying Ghost behind Cloudflare Tunnel, things looked wrong:
- Infinite redirect loops (
ERR_TOO_MANY_REDIRECTS) - Mixed content warnings — the page loads but CSS/JS references
http://URLs - Admin panel redirecting to HTTP and breaking
The Root Cause
The TLS/HTTP handoff creates a mismatch:
- The browser connects to Cloudflare over HTTPS
- Cloudflare terminates TLS and forwards to your tunnel over HTTP
- Traefik receives the request as HTTP
- Your app sees an HTTP request and thinks: "I'm not on HTTPS" — generates HTTP URLs, forces redirects, etc.
The app doesn't know the original request was HTTPS because nobody told it.
The Fix (Two Parts)
Part 1: Traefik middleware to set X-Forwarded-Proto
Add middleware to Traefik that tells your apps "the original request was HTTPS":
# In your Traefik dynamic config or Docker labels:
labels:
  - "traefik.http.middlewares.https-scheme.headers.customrequestheaders.X-Forwarded-Proto=https"
  - "traefik.http.routers.your-app.middlewares=https-scheme"
This injects the X-Forwarded-Proto: https header into every request reaching your app.
Part 2: Tell your app to trust the proxy
Most web frameworks ignore X-Forwarded-* headers by default (to prevent spoofing). You need to explicitly enable proxy trust.
For Ghost, set this environment variable:
environment:
  server__trustProxy: "true"
For other frameworks:
| Framework | Setting |
|---|---|
| Express.js | app.set('trust proxy', true) |
| Django | SECURE_PROXY_SSL_HEADER = ('HTTP_X_FORWARDED_PROTO', 'https') |
| Rails | config.force_ssl = true + config.assume_ssl = true |
| Laravel | Set TRUSTED_PROXIES=* in .env |
| Next.js | Generally works out of the box with headers |
| Flask | ProxyFix(app, x_proto=1) |
Part 3: Cloudflare SSL setting
In Cloudflare Dashboard → SSL/TLS, set the encryption mode to Full (not "Flexible"). Flexible tries to connect to your origin over HTTP and can cause redirect loops when your app expects HTTPS.
The Pattern
This three-part fix works for every app behind Cloudflare Tunnel + Traefik:
- Traefik injects
X-Forwarded-Proto: https - App trusts proxy headers
- Cloudflare SSL mode set to Full
Internalize this pattern. You'll use it every time.
Cost Comparison
| Home Server | DigitalOcean | AWS | |
|---|---|---|---|
| Compute | $0 (existing hardware) | $24–48/mo | $30–60/mo |
| Domain | ~$10/year | ~$10/year | ~$10/year |
| Cloudflare | $0 (free tier) | N/A | N/A |
| SSL | $0 (Cloudflare) | $0 (Let's Encrypt) | $0 (ACM) |
| Managed DB | $0 (self-hosted) | $15–50/mo | $15–100/mo |
| Load balancer | $0 (Traefik) | $12/mo | $16/mo |
| Total (3 apps) | ~$1/mo (electricity) | $75–150/mo | $100–250/mo |
| Annual savings | — | $900–1,800 | $1,200–3,000 |
The home server costs you electricity and a domain. That's it. For MVP stage, that's the right answer.
When to Move to the Cloud
The home setup is great for MVPs and early traction, but you'll outgrow it when:
- You need uptime guarantees. Home internet goes down. Power goes out. Your setup has zero redundancy. If a customer SLA matters, move to the cloud.
- Latency matters. Your home server is in one location. Cloud providers have regions worldwide. If users in Asia are hitting a server in your apartment in Ohio, they'll notice.
- You're scaling past your hardware. When your apps need more RAM/CPU than your machine has, it's time.
- Security requirements increase. Enterprise customers will ask about SOC 2, data residency, etc. "It's in my office" is not the answer they want.
- Your team grows. Multiple engineers need access to infrastructure. Cloud platforms have better IAM, audit logs, and collaboration tools.
The good news: if you're using Docker and Coolify, migrating is straightforward. Export your compose files, spin up a VPS, deploy. The app doesn't care where it runs.
Conclusion
The best infrastructure for an MVP is the one that costs nothing and gets out of your way.
Cloudflare Tunnel + a home machine + Coolify gives you:
- Unlimited apps on a single machine with wildcard routing
- HTTPS everywhere with zero certificate management
- Git-push deploys through Coolify's dashboard
- $0/month infrastructure cost
Stop paying cloud providers to run your prototype. Ship from home, get users, validate the idea — then spend money on infrastructure when the revenue justifies it.
Copying This Article to Another Machine
Since the home server has SSH access through the tunnel, you can pull this file from any machine:
scp kevin@ssh.httprapidoccasions.com:/home/kevin/Development/personal/innovate-hub/infra/office-tunnel/blog-home-server-mvp.md ./blog-home-server-mvp.md
Or if using a non-standard SSH port or key:
scp -i ~/.ssh/your_key kevin@ssh.httprapidoccasions.com:/home/kevin/Development/personal/innovate-hub/infra/office-tunnel/blog-home-server-mvp.md .
Note: SSH through Cloudflare Tunnel requires the client to use cloudflared access as a proxy. Set up your ~/.ssh/config:
Host ssh.httprapidoccasions.com
    ProxyCommand cloudflared access ssh --hostname %h
    User kevin
Then scp works as normal:
scp ssh.httprapidoccasions.com:/home/kevin/Development/personal/innovate-hub/infra/office-tunnel/blog-home-server-mvp.md .